
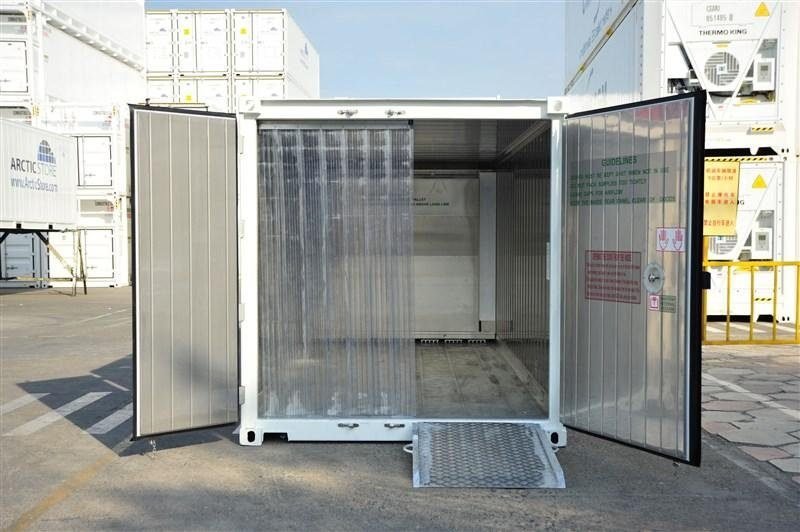
Steel conducts heat brilliantly, which is exactly the problem. An uninsulated container bakes in summer, freezes in winter, and — the issue that actually damages stored goods — drips. Warm moist air meets a cold steel ceiling, condenses, and rains back down on whatever is underneath. Insulation is the fix for all three.
This guide compares the four practical insulation methods on cost, thickness, R-value and installation difficulty, explains the condensation physics well enough that you can design around it, and covers the mistakes that cause insulated containers to rot from the inside.
Why Containers Sweat: The Physics in One Paragraph
Air holds a maximum amount of water vapour that depends on its temperature. The dew point is the temperature at which the air in your container becomes saturated; cool any surface below that temperature and water condenses on it. Because steel follows the outside air temperature almost instantly, the ceiling and walls of a container are routinely the coldest surfaces present — so that is where condensation forms first.
Two facts are worth knowing. First, transport-industry loss-prevention guidance identifies dew point as the limiting value for condensation, and it establishes that the largest moisture sources inside a closed container are usually the cargo itself, its packaging, the wooden floor and any hygroscopic packing material — not air leaking in. Second, colour matters more than people expect: measured data shows a dark-painted container can reach interior temperatures roughly 12 °C higher than a white-painted one under the same ambient conditions.
The practical implication: insulation works by keeping the inner surface above the dew point. Anything that leaves a cold steel surface exposed — a gap in the insulation, an uninsulated roof, a thermal bridge at a stud — will collect water even if everything around it is insulated well.
Insulation Options Compared
| Method | Typical R-value per inch | Space lost | DIY? | Relative cost | Best for |
|---|---|---|---|---|---|
| Closed-cell spray foam | ~R-6 to R-7 | 2–3 in per wall | Professional | Highest | Year-round occupied space |
| Rigid foam board (polyiso / XPS) | ~R-5 to R-6.5 | 2–4 in per wall | Yes | Moderate | Workshops, offices, DIY builds |
| Batt / mineral wool in a stud frame | ~R-3 to R-4 | 4–6 in per wall | Yes | Lowest material cost | Dry climates, framed conversions |
| Insulated blanket / ceramic coating | Low | Minimal | Yes | Low | Temporary use, radiant heat control |
| Factory-insulated shell (reefer) | Whole-wall system | Already built in | N/A | Varies | Cold storage and dry rooms |
Closed-cell spray foam
The most effective option and the one with the fewest failure modes. It bonds directly to the corrugated steel, fills every corrugation and corner, adds rigidity, and acts as its own vapour barrier — which is the crucial part. Because no air can reach the steel, there is no cold surface for moisture to condense on.
Downsides: it is the most expensive method, it is essentially permanent, and it should be applied by someone who does it for a living. Applied too thin it will not perform; applied badly it traps moisture rather than excluding it. Two to three inches on the walls and ceiling is a common specification for a heated or cooled space.
Rigid foam board
Polyiso or XPS boards cut to fit between furring strips. The best balance of performance, cost and DIY practicality. The whole job lives or dies on how well you seal the seams — every unsealed joint is a path for moist air to reach cold steel behind the board. Tape the seams, foam the edges, and pay attention where the boards meet the corner posts.
Expect to lose 2–4 inches per wall including the batten and internal lining, which is another argument for buying a high cube container if the box is going to be insulated. That extra foot of height absorbs a ceiling build-up without leaving you stooping.
Batt and mineral wool
Cheapest by the roll and familiar to any builder, but it needs a stud frame, needs a properly detailed vapour barrier on the warm side, and it is unforgiving of installation error. Fiber insulation that gets damp loses most of its R-value and holds the moisture against your framing. In a humid climate or an unheated container, this is the method most likely to disappoint.
Insulated blankets and coatings
Blankets hung inside the container are quick, removable and cheap — a reasonable answer for a temporary site office or a seasonal need. Ceramic and anti-condensation coatings applied to the interior steel do not deliver meaningful R-value, but they do raise the surface temperature slightly and give condensate somewhere to be absorbed and re-evaporate. A 15ft container with anti-condensation coating shows the approach applied at the factory.
Buy the insulation already built in
The often-overlooked option: a container that came insulated from the manufacturer. Purpose-built 20ft insulated storage units and units like the 40ft insulated container with HVAC arrive finished, with no site work at all.
Better still for many buyers: a non-working reefer. A refrigerated container is insulated foam sandwiched between steel skins on all six faces, engineered to hold temperature against ocean conditions — a specification no site-applied insulation matches. When the refrigeration machinery no longer runs, the shell is unaffected, and a unit like the non-working 40ft HC reefer gives you all that insulation without paying for a compressor you will never switch on. The non-working reefer guide works through the economics.
Insulate the Roof First
If budget forces you to stage the work, do the ceiling before the walls. The roof takes the most direct solar gain in summer, radiates heat to a clear night sky in winter, and is where condensation forms and then drips onto your contents. An insulated wall with an uninsulated ceiling still rains.
The floor is the third priority for most uses, and the first if anyone will stand on it for hours. Container plywood on steel cross-members is a serious cold bridge.
Ventilation Is Not Optional
Insulation slows heat transfer; it does not remove moisture. Every container that is insulated and occupied also needs a way for water vapour to leave, or the humidity simply rises until it condenses somewhere you cannot see.
The rule that maritime loss-prevention practice settles on is worth knowing: ventilate only when the dew point outside is lower than the dew point inside. Ventilating with air that is more humid than what you already have makes the problem worse, which is why a container left open on a muggy day can end up wetter than one kept shut.
Practical measures, roughly in order of impact:
- Fit passive vents high and low on opposite ends to drive a convection loop.
- Insulate so that no interior surface falls below the dew point.
- Use desiccants in sealed storage where no airflow is possible.
- Run a dehumidifier if the space is powered and occupied.
- Keep the container off the ground and off soil so it is not fed moisture from below.
- Keep wet timber, damp cardboard and hygroscopic goods out — they are usually the actual water source.
- Repair roof dents that pond water and replace perished door gaskets.
Common Mistakes
- Vapour barrier on the wrong side. It belongs on the warm-in-winter face. Reversed, it traps condensate inside the wall.
- Leaving the corner posts and cross-members bare. These are the coldest thermal bridges in the box and they will run with water.
- Insulating a leaking container. Fix the roof and seals first; insulation over a leak hides rot rather than preventing it.
- Insulating the walls and ceiling but not the doors. The door end is a large uninsulated panel with a poor seal.
- Assuming a standard-height box will do. By the time you have added a ceiling build-up and a floor, a standard container is uncomfortably low.
Which Method for Which Job
| Use | Recommended approach |
|---|---|
| Unheated dry storage | Vents plus a reflective or anti-condensation coating; insulate the ceiling if contents are sensitive |
| Workshop used in daylight hours | Rigid board on walls and ceiling, sealed seams, plus vents |
| Office or occupied space | Closed-cell spray foam throughout, plus mechanical ventilation |
| Cold room or temperature-controlled | Factory-insulated reefer shell |
| Seasonal or temporary | Insulated blankets, removable |
Ready-insulated stock is worth checking before you plan a site build. Our modified containers include lined and insulated units, the refrigerated containers category covers working and non-working reefer shells, and the 15ft containers include a factory anti-condensation option. If you describe the climate and the intended use, our sales desk can tell you which route is genuinely cheaper for your project.
Frequently Asked Questions
What is the best insulation for a shipping container?
Closed-cell spray foam performs best because it bonds to the steel, fills every corrugation and acts as its own vapour barrier, leaving no cold surface for condensation. Rigid foam board is the best DIY compromise, provided every seam is sealed. Batt insulation is cheapest by the roll but least tolerant of installation error.
How do I stop condensation in a shipping container?
Keep every interior surface above the dew point and give moisture a way out. That means insulating the ceiling as well as the walls, fitting vents high and low at opposite ends, keeping the container clear of the ground, and keeping damp timber and cardboard out. Ventilate only when outside air is drier than inside air.
How much interior space does insulation cost me?
Roughly 2 to 3 inches per surface for spray foam and 2 to 4 inches for rigid board including battens and lining. On a standard-height container that leaves about 7'4" of finished ceiling. If the container is going to be insulated and occupied, a high cube is usually worth the modest premium.
Should I insulate the floor of a shipping container?
Insulate the ceiling first, the walls second and the floor third for most uses — but move the floor up the list if anyone will stand or work on it for long periods. Container plywood sitting directly on steel cross-members is a substantial cold bridge and an uncomfortable surface in winter.
Is a used reefer a cheaper way to get an insulated container?
Often, yes. A refrigerated container is insulated on all six faces to a standard no site-applied insulation matches, and a non-working unit sells for far less than a working one because the machinery is not part of the value. If you want a heavily insulated shell rather than active refrigeration, it is worth comparing before planning a site insulation job.